Brakeman scanner reference for STO
You can run Brakeman scans on your Ruby on Rails applications.
Important notes for running Brakeman scans in STO
Docker-in-Docker requirements
The following use cases require a Docker-in-Docker background step in your pipeline:
- Container image scans on Kubernetes and Docker build infrastructures
- Required for Orchestration and Dataload scan modes
- Security steps (not step palettes) on Kubernetes and Docker build infrastructures
- Required for all target types and Orchestration/DataLoad modes
The following use cases do not require Docker-in-Docker:
- Harness Cloud AMD64 build infrastructures
- SAST/DAST/configuration scans that use scanner templates (not Security steps)
- Ingestion scans where the data file has already been generated
Set up a Docker-in-Docker background step
-
Go to the stage where you want to run the scan.
-
In Overview, add the shared path
/var/run. -
In Execution, do the following:
-
Click Add Step and then choose Background.
-
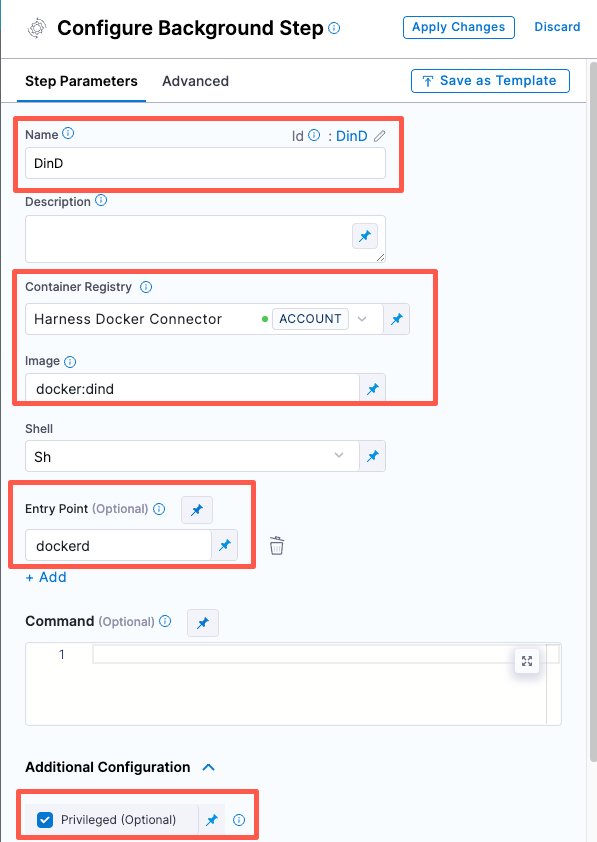
Configure the Background step as follows:
-
Dependency Name =
dind -
Container Registry = The Docker connector to download the DinD image. If you don't have one defined, go to Docker connector settings reference.
-
Image =
docker:dind -
Under Entry Point, add the following:
dockerdIn most cases, using
dockerdis a faster and more secure way to set up the background step. For more information, go to the TLS section in the Docker quick reference.
If the DinD service doesn't start with
dockerd, clear the Entry Point field and then run the pipeline again. This starts the service with the default entry point.- Under Optional Configuration, select the Privileged checkbox.
-
-
- Visual setup
- YAML setup
Add a Background step to your pipeline and set it up as follows:
- step:
   type: Background
   name: background-dind-service
   identifier: Background_1
   spec:
      connectorRef: CONTAINER_IMAGE_REGISTRY_CONNECTOR
      image: docker:dind
      shell: Sh
      entrypoint:
         - dockerd
      privileged: true
Root access requirements
You need to run the scan step with root access if either of the following apply:
-
You need to run a Docker-in-Docker background service.
-
You need to add trusted certificates to your scan images at runtime.
You can set up your STO scan images and pipelines to run scans as non-root and establish trust for your own proxies using self-signed certificates. For more information, go to Configure STO to Download Images from a Private Registry.
For more information
The following topics contain useful information for setting up scanner integrations in STO:
Brakeman step settings for STO scans
The recommended workflow is add a Brakeman step to a Security Tests or CI Build stage and then configure it as described below.
Scan
Scan Mode
- Orchestration Configure the step to run a scan and then ingest, normalize, and deduplicate the results.
- Ingestion Configure the step to read scan results from a data file and then ingest, normalize, and deduplicate the data.
Scan Configuration
The predefined configuration to use for the scan. All scan steps have at least one configuration.
Target
Type
-
Repository Scan a codebase repo.
In most cases, you specify the codebase using a code repo connector that connects to the Git account or repository where your code is stored. For information, go to Configure codebase.
Name
The identifier for the target, such as codebaseAlpha or jsmith/myalphaservice. Descriptive target names make it much easier to navigate your scan data in the STO UI.
It is good practice to specify a baseline for every target.
Variant
The identifier for the specific variant to scan. This is usually the branch name, image tag, or product version. Harness maintains a historical trend for each variant.
Workspace (repository)
The workspace path on the pod running the scan step. The workspace path is /harness by default.
You can override this if you want to scan only a subset of the workspace. For example, suppose the pipeline publishes artifacts to a subfolder /tmp/artifacts and you want to scan these artifacts only. In this case, you can specify the workspace path as /harness/tmp/artifacts.
Ingestion File
The path to your scan results when running an Ingestion scan, for example /shared/scan_results/myscan.latest.sarif.
-
The data file must be in a supported format for the scanner.
-
The data file must be accessible to the scan step. It's good practice to save your results files to a shared path in your stage. In the visual editor, go to the stage where you're running the scan. Then go to Overview > Shared Paths. You can also add the path to the YAML stage definition like this:
    - stage:
      spec:
        sharedPaths:
          - /shared/scan_results
Log Level, CLI flags, and Fail on Severity
Log Level
The minimum severity of the messages you want to include in your scan logs. You can specify one of the following:
- DEBUG
- INFO
- WARNING
- ERROR
Additional CLI flags
You can use this field to customize the scan with specific command-line arguments supported by that scanner.
For example, suppose you want to scan only a subpath rather than the full directory. You can use --path followed by the path: --path some/path/to/app
Fail on Severity
Every Security step has a Fail on Severity setting. If the scan finds any vulnerability with the specified severity level or higher, the pipeline fails automatically. You can specify one of the following:
CRITICALHIGHMEDIUMLOWINFONONE— Do not fail on severity
The YAML definition looks like this: fail_on_severity : critical # | high | medium | low | info | none
Additional Configuration
In the Additional Configuration settings, you can use the following options:
Advanced settings
In the Advanced settings, you can use the following options: