Kubernetes cluster connector settings reference
This topic provides settings and permissions for the Harness Kubernetes cluster connector. The Kubernetes cluster connector is a platform-agnostic connection to a Kubernetes cluster located anywhere. For cloud platform-specific connectors, go to Cloud Connectors.
This video demonstrates how to add a Harness Kubernetes cluster connector and Harness Kubernetes delegate. The delegate is added to the target cluster, and then the Kubernetes cluster connector uses the delegate to connect to the cluster when a Harness pipeline runs.
You can create connectors in the Harness UI or in YAML. Here's an example of Kubernetes cluster connector YAML:
connector:
  name: Doc Kubernetes Cluster
  identifier: Doc_Kubernetes_Cluster
  description: ""
  orgIdentifier: ""
  projectIdentifier: ""
  tags: {}
  type: K8sCluster
  spec:
    credential:
      type: ManualConfig
      spec:
        masterUrl: https://00.00.00.000
        auth:
          type: UsernamePassword
          spec:
            username: john.doe@example.io
            passwordRef: account.gcpexample
Platform-agnostic Kubernetes cluster connector vs Platform-specific connectors
The Kubernetes cluster connector is platform-agnostic. You can use it to access a cluster on any platform. The Kubernetes cluster connector can't access platform-specific services and resources. For those, you need a platform-specific connector, like the GCP connector or the AWS connector.
For example, if you have a GKE Kubernetes cluster hosted in GCP, you can use the Kubernetes cluster connector to connect Harness to the cluster in GCP (for example to run your Harness CI build infrastructure), but the Kubernetes cluster connector can't also access Google Container Registry (GCR). In this case, you have two options:
- Use a GCP connector to access the GKE cluster and all other GCP resources you need.
- Use a Kubernetes cluster connector for the GKE cluster and a GCP connector for all other GCP services and resources.
When you set up a Harness CD deployment, you specify the connector to use for the artifact and target cluster. If you create both a Kubernetes cluster connector and a GCP connector, you select the GCP connector for the GCR container and the Kubernetes cluster connector for the target cluster.
The option you use depends on how your clusters are configured, where they are located, and how your teams use Harness.
Roles and policies for the connector
What roles should my Kubernetes account have? The roles and policies needed by the account associated with your connector depend on how you'll use the connector in your Harness pipelines and what actions you need Harness to perform in the cluster.
You can use different methods for authenticating with the Kubernetes cluster, but all of them use a Kubernetes Role. The Role used must have either the cluster-admin permission in the target cluster or admin permissions in the target namespace. For more information, go to User-Facing Roles in the Kubernetes documentation.
Deployments (CD)
A Kubernetes service account with permission to create entities in the target namespace is required. The set of permissions should include list, get, create, watch (to fetch the pod events), and delete permissions for each of the entity types Harness uses. In general, cluster admin permission or namespace admin permission is sufficient.
If you don't want to use resources: ["*"] for the Role, you can list out the resources you want to grant. Harness needs configMap, secret, event, deployment, and pod at a minimum for deployments, as stated above. Beyond that, it depends on the resources you are deploying via Harness.
If you don't want to use verbs: ["*"] for the Role, you can list out all of the verbs (create, delete, get, list, patch, update, watch).
The YAML provided for the Harness Delegate defaults to cluster-admin because that ensures anything could be applied. Any restriction must take into account the actual manifests to be deployed.
Builds (CI)
Clusters used for Harness CI builds require a Kubernetes service account with CRUD permissions on Secret, Service, Pod, and PersistentVolumeClaim (PVC). You need the following permissions for a service account role for a Kubernetes cluster connector.
- Pods and secrets:
creategetlistwatchupdatedelete
- Events:
listwatch
For Harness CI, the delegate requires CRUD permissions on Secret and Pod.
If your Kubernetes cluster connector is for both Harness CI and CD, make sure the cluster also meets the Deployments (CD) permissions requirements.
For information about building on OpenShift clusters, go to OpenShift support
Example Service Account and RoleBinding for CI
Here is a Service Account and RoleBinding that lists the minimum permissions:
apiVersion: v1
kind: Namespace
metadata:
  name: cie-test
---
apiVersion: v1
kind: ServiceAccount
metadata:
  name: cie-test-sa
  namespace: cie-test
---
kind: Role
apiVersion: rbac.authorization.k8s.io/v1
metadata:
  name: sa-role
  namespace: cie-test
rules:
  - apiGroups: [""]
    resources: ["pods", "secrets"]
    verbs: ["get", "list", "watch", "create", "update", "delete"]
  - apiGroups: [""]
    resources: ["events"]
    verbs: ["list", "watch"]
---
kind: RoleBinding
apiVersion: rbac.authorization.k8s.io/v1
metadata:
  name: sa-role-binding
  namespace: cie-test
subjects:
  - kind: ServiceAccount
    name: cie-test-sa
    namespace: cie-test
roleRef:
  kind: Role
  name: sa-role
  apiGroup: rbac.authorization.k8s.io
Harness CI cluster requirements
For Harness CI, the resources required for the Kubernetes cluster depends on the number of builds running in parallel, as well as the resources required for each build.
Below is a rough estimation of the resources required, based on the number of daily builds:
| PRs/Day | Nodes with 4 CPU, 8GB RAM,100GB disk | Nodes with 8 CPU, 16GB RAM, 200GB disk |
|---|---|---|
| 100 | 19 - 26 | 11 - 15 |
| 500 | 87 - 121 | 45 - 62 |
| 1000 | 172 - 239 | 89 - 123 |
Kubernetes cluster connector settings
Basic settings
- Name: The unique name for this connector.
- ID: Entity Identifier.
- Description: Optional text string.
- Tags: Optional tags.
Use the Credentials of a Specific Harness Delegate
Harness recommends using delegate credentials when possible. Install and run the Harness Kubernetes delegate in the target Kubernetes cluster, and then configure the Kubernetes cluster connector to connect to that cluster through that delegate. This is the simplest method to connect to a Kubernetes cluster. You can either provide the authentication details of the target cluster or use a role associated with the Harness Delegate in your cluster.
When you select a delegate, the Harness Delegate inherits the Kubernetes service account associated with the delegate pod. The service account associated with the delegate pod must have the Kubernetes cluster-admin role.
Specify Master URL and Credentials
This is an alternative to inheriting delegate credentials.
For Master URL, provide the Kubernetes master node URL. To get the master URL, use kubectl cluster-info.
For Authentication, select and configure one of the authentication methods described below.
Username and Password
Harness doesn't recommend basic (username and password) authentication, and it is disabled for some connectors.
Basic authentication is not supported in Kubernetes client version 1.19 and later.
Basic authentication has been removed in GKE 1.19 and later.
Provide the credentials for the cluster, not the platform.
- Username: Username for the Kubernetes cluster. For example,
adminorjohn@example.com. You enter plaintext or use a Harness Encrypted Text secret. - Password: Password for the Kubernetes cluster, such as a basic authentication password. You must select or create a Harness Encrypted Text secret.
Service Account
Select or create a Harness encrypted text secret containing the decoded service account token for the service account. The secret must contain the decoded token for the connector to function correctly. The service account doesn't have to be associated with a delegate.
In Kubernetes version 1.24 and later, service account token secrets are no longer automatically generated. Instead, you can use the TokenRequest subresource to obtain a token that can be used to access the Kubernetes API. Here's how you can use the TokenRequest subresource:
-
Create a
TokenRequestmanifest. Write a YAML or JSON manifest that describes theTokenRequestobject. The manifest should specify the namespace and name of theServiceAccountfor which you want to obtain a token. Here's an exampleTokenRequestmanifest:apiVersion: authentication.k8s.io/v1
kind: TokenRequest
metadata:
name: my-token-request
spec:
audiences:
- api
expirationSeconds: 3600In this example, the
audiencesfield specifies the intended audience of the token, which is set toapi. TheexpirationSecondsfield determines the token's validity period (in this case,3600seconds or one hour). -
Apply the
TokenRequest. Use the kubectl command-line tool to apply theTokenRequestmanifest to the Kubernetes cluster:kubectl apply -f token-request.yaml -
Retrieve the token. After applying the
TokenRequest, aTokenRequestobject is created in the cluster. You can retrieve the token using the following command:kubectl get tokenrequest my-token-request -o jsonpath='{.status.token}' | base64 -
Paste the token into a Harness encrypted text secret and then use that secret for the connector's Service Account Token.
OpenID Connect
These settings come from your OIDC provider authorization server or the provider app you use to log in.
The following settings are from the authorization server settings:
-
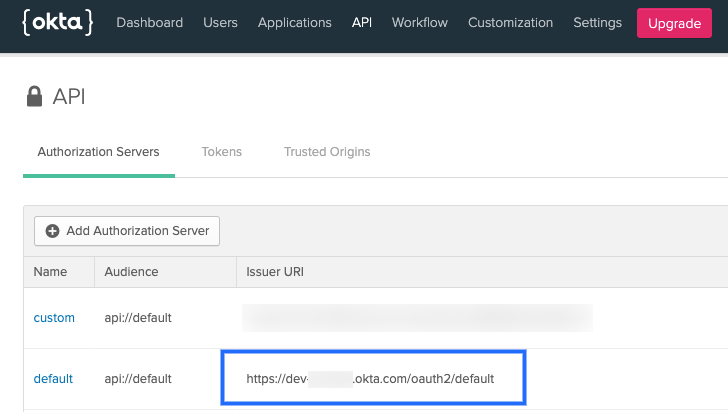
Master URL: The issuer URI for the provider authentication server.
For example, in Okta, this is the Issuer URL for the Authorization Server.
Providers use different API versions. If you want to identify the version also, you can obtain it from the token endpoint.
For example, in Okta, in the authentication server settings, select Metadata URI, locate the token_endpoint, and use the token_endpoint URL without the
/tokenpart. For example, you would usehttps://dev-00000.okta.com/oauth2/default/v1from"token_endpoint":"https://dev-00000.okta.com/oauth2/default/v1/token" -
OIDC Username and Password: Login credentials for a user assigned to the provider app.
-
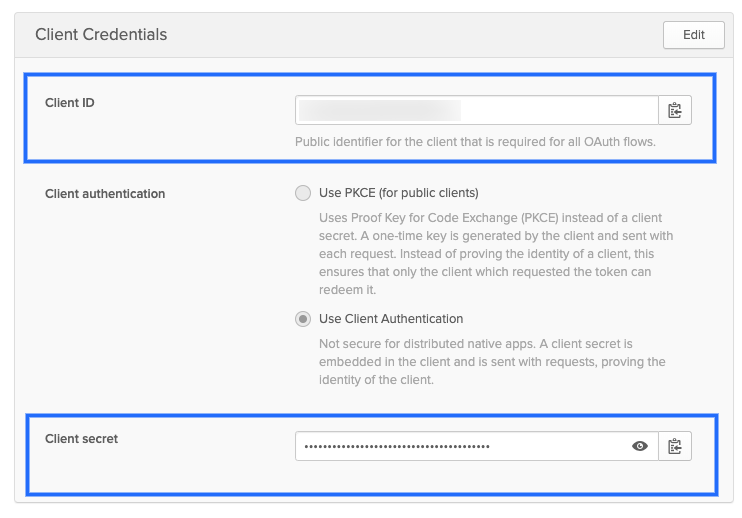
OIDC Client ID: Public identifier for the client that is required for all OAuth flows. For example, in Okta, this is located in the Client Credentials for the app.
-
OIDC Secret: The client secret for the app. For Okta, this is located in the Client Credentials for the app.
-
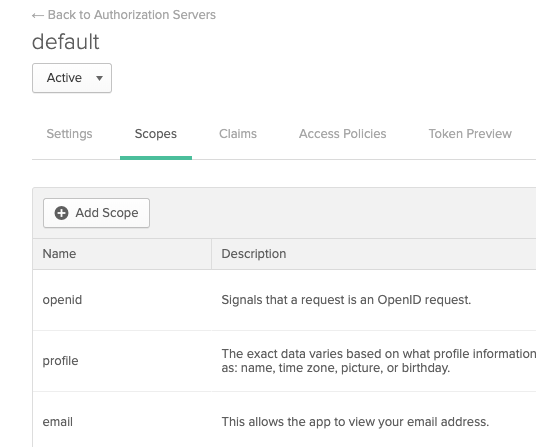
OIDC Scopes: OIDC scopes are used by an application during authentication to authorize access to a user's details, like name and picture. In Okta, you can find them in the Authorization Server Scopes tab.
If you enter multiple scopes, use spaces to separate them.
The following settings are part of the provider app you use to log in:
- Client Key Certificate: All secrets must be Base64 encoded. Here is an example command to create Base64 values for a client key:
cat myuser.key | base64 | tr -d "\n". - Client Key: Create or select a Harness secret containing the client key for the client certificate. The key must be pasted into the secret Base64 encoded.
- Client Key passphrase: Create or select a Harness secret containing the client key passphrase. The passphrase must be pasted in Base64 encoded.
- Client Certificate: Create or select a Harness secret containing the client certificate for the cluster. The public client certificate is generated along with the private client key used to authenticate. The certificate must be pasted in Base64 encoded.
- Client Key Algorithm (optional): Specify the encryption algorithm used when the certificate was created. Typically, RSA.
- CA Certificate (optional): Create or select a Harness secret to add the Certificate authority root certificate used to validate client certificates presented to the API server. The certificate must be pasted in Base64 encoded. For more information, go to the Kubernetes authentication documentation.
Amazon AWS EKS support
You can use a Kubernetes cluster connector for AWS EKS by selecting the Inherit Delegate Credentials option. You can also use your EKS service account token for authentication.
To use the platform-agnostic Kubernetes cluster connector with your AWS EKS infrastructure:
- Install a Harness Kubernetes delegate in your EKS cluster. You must be logged in as an admin user when you run the
kubectl apply -f harness-delegate.yamlcommand. - Give it a name that you can recognize as an EKS cluster delegate. For information on installing a Kubernetes delegate, go to Install a Kubernetes delegate.
- In the connector settings, select to connect through the delegate that you installed in your cluster.
- When setting up the EKS cluster as build infrastructure or the target infrastructure for a deployment, select your Kubernetes cluster connector.
To use an EKS cluster for Kubernetes cluster build infrastructure in Harness CI, you must create a platform-agnostic Kubernetes cluster connector for the stage's build infrastructure, and then you can use either type of connector in individual steps in the stage. However, for individual steps in a build stage, if your EKS clusters use IRSA (for the delegate's service account or with OIDC Provider) or Fargate nodes in EKS clusters, use an AWS connector configured for EKS.
OpenShift support
This section describes how to support OpenShift using a delegate running externally to the Kubernetes cluster. Harness supports running delegates internally for OpenShift 3.11 or later if the cluster is configured to allow images to run as root inside the container, which is required to write to the filesystem. Typically, OpenShift is supported through an external delegate installation (meaning a shell script installation of the delegate outside of the Kubernetes cluster) and a service account token (entered in the Service Account setting).
You need to use the Master URL and Service Account Token settings in the Kubernetes Cluster Connector settings.
You can use the following shell script to get the service account token. Run this script wherever you run kubectl to access the cluster, and set the SERVICE_ACCOUNT_NAME and NAMESPACE values to the values in your infrastructure.
SERVICE_ACCOUNT_NAME=default
NAMESPACE=mynamepace
SECRET_NAME=$(kubectl get sa "${SERVICE_ACCOUNT_NAME}" --namespace "${NAMESPACE}" -o json | jq -r '.secrets[].name')
TOKEN=$(kubectl get secret "${SECRET_NAME}" --namespace "${NAMESPACE}" -o json | jq -r '.data["token"]' | base64 -D)
echo $TOKEN
Once configured, OpenShift is used by Harness as a typical Kubernetes cluster.
OpenShift notes
- If you decide to use username and password credentials in the Harness Kubernetes cluster connector, don't use the username and password for the OpenShift platform. Use the cluster's username and password.
- Harness supports DeploymentConfig, Route, and ImageStream across Canary, Blue Green, and Rolling deployment strategies. Use
apiVersion: apps.openshift.io/v1instead ofapiVersion: v1. - The SA token doesn't need global read permissions. The token can be scoped to the namespace.
- The Kubernetes containers must be OpenShift-compatible containers. If you're already using OpenShift, then this is already configured. Be aware that OpenShift can't deploy any Kubernetes container. You can get OpenShift images from the public repos at https://hub.docker.com/u/openshift and https://access.redhat.com/containers.
- Useful documentation for setting up a local OpenShift cluster for testing: How To Setup Local OpenShift Origin (OKD) Cluster on CentOS 7 and OpenShift Console redirects to 127.0.0.1.
- You need the following permissions on Secret, Pod, and Event to run Harness CI builds in an OpenShift cluster:
create,get,list,watch,update,delete